Showing posts with label decorate your pad. Show all posts

Tuesday, January 17, 2012

What to do with a thrifted frame, #2 - Antique Gold

I'm digging anything with either the "gilded" or "antique gold" look or stuff that's old and busted. So here's my take on how to made a thrifted frame do both.

Antique Gold Frame

Supplies: 

Work already in progress...sorry
  • Wooden or plastic frame...plain or ornate
  • Fine grit sandpaper (I used 320)
  • Acrylic paint in dark brown and "vintage" gold
  • Foam brush
  • Paper towels
  • Gloves
  • Newspaper (several layers)
  • Plastic cup with water (for dunking brushes between coats)

Steps:

  1. Prep work - Remove the glass an guts of the frame, and clean thoroughly. If your frame is wooden, you'll probably need to sand it to remove any varnish or coating on the frame (I sanded mine with 320 grit paper, and I don't think I got all the varnish off, but I don't think it really mattered in the end). Wipe any sanding dust off with a rag and completely dry the frame.

  2. Base coat - Spread out your newspaper, don some gloves, squirt some brown paint onto you paper and and generously apply to make a base coat.  It doesn't have to be perfect...you'll be painting over it. Dunk you brush in the water cup when you're done so it doesn't dry out (just make sure you dry it off pretty good before the next step).
    My base coat is going on more like a stain...whatever!
  3. Apply the gold paint - Don't wait for the brown to completely dry. Go ahead and start slathering on the gold paint.  I like the gold and brown to mix a bit, warming up the brown and making it less flat underneath. Let dry slightly between coats until you get the desired level of "goldness" (totally up to you...if you want it to be less metallic and more earthy, don't paint on so much gold). Dunk the brush when you're done.
    Keep piling on the gold until you feel you've got the right color. You don't have to let completely dry between coats.

    Done painting the gold. I like to use my work surface as my palette...less to clean up!
  4. Let the paint dry - Yep, this time, you gotta let it dry -- all the way.  Go make a pot of tea.

  5. Fill in the cracks - This part is hard to photograph by yourself, so bear with me.  Here's how it goes: 1. Jab some brown paint in the cracks and crevices; 2. quickly wipe the paint off with a paper towel (you don't want it on the flat surfaces); 3) turn the towel to find a clean spot.  Repeat that process until you've jabbed and wiped around the entire frame.  Make sure you use only the clean part of the towel when you wipe...you're wiping paint OFF, not buffing it ON.
    Jab brown into the cracks. I like using the foam brush b/c it has that little point on the end
    Wipe off the paint.

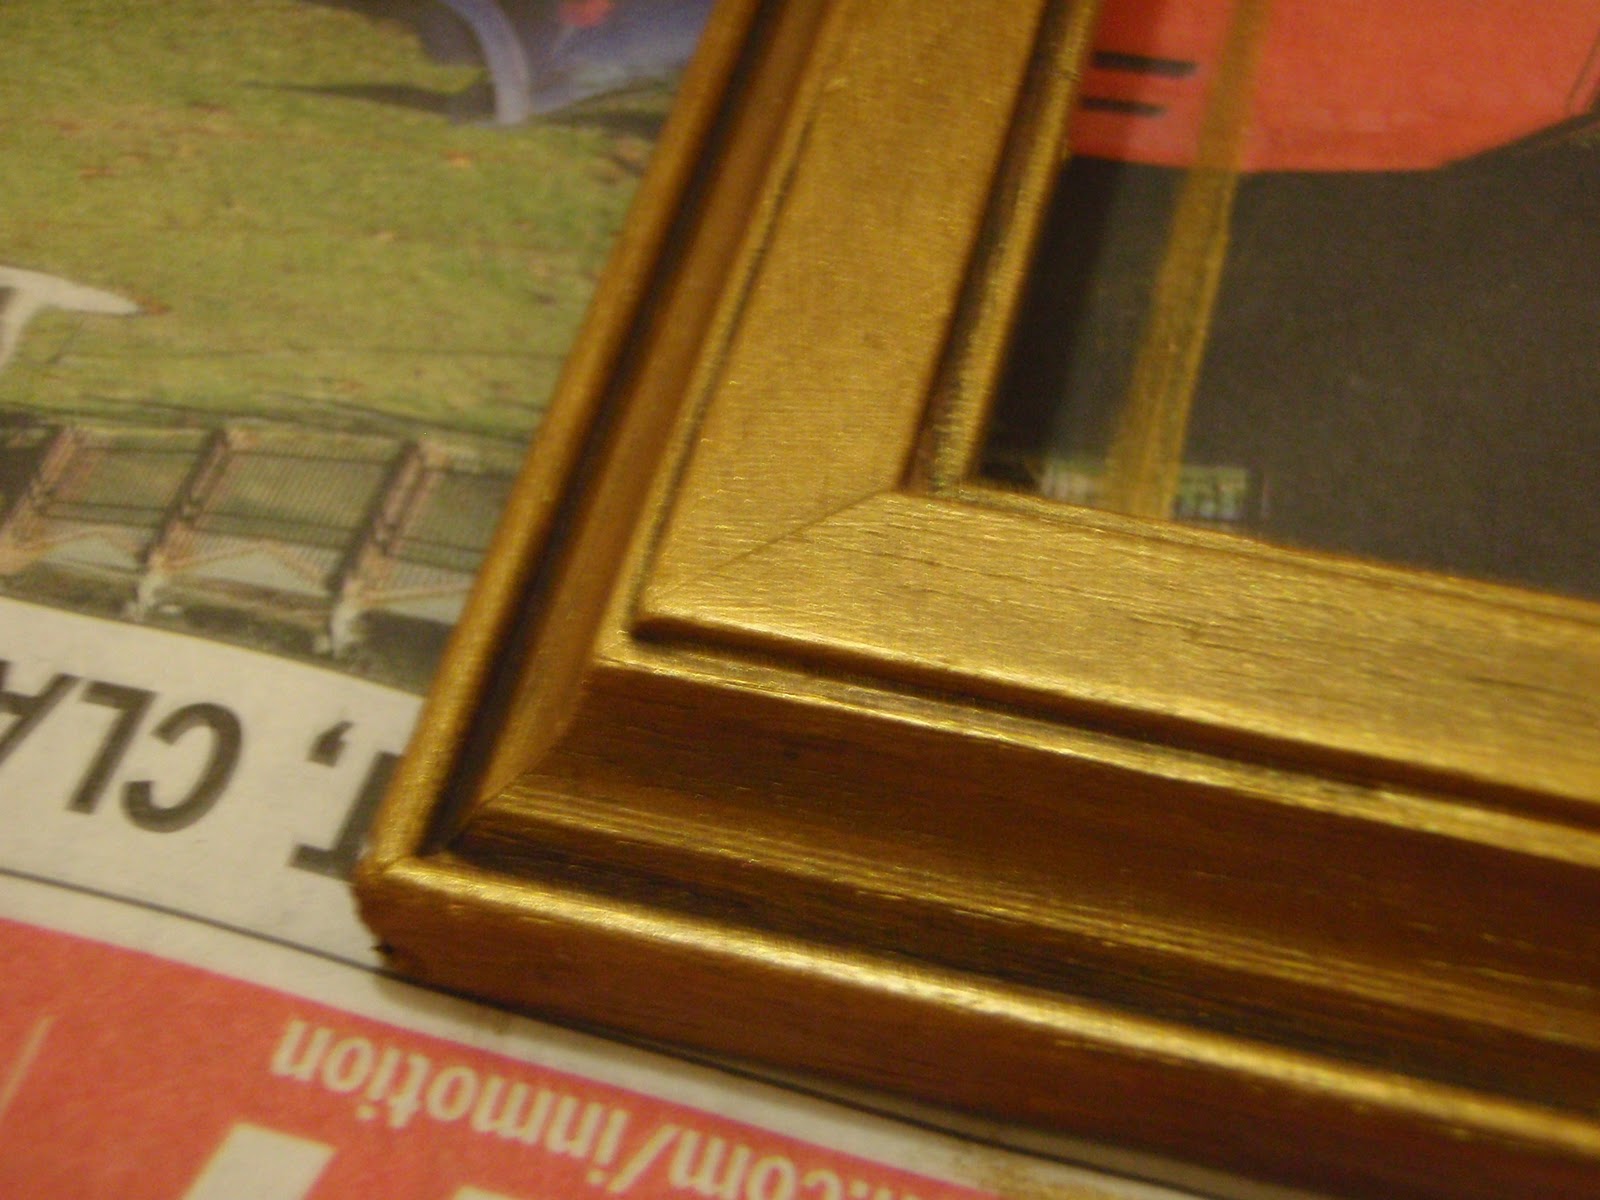
    Finished crack with extra brown.

    I think the extra brown adds a bit of "age" and dimension to the look...like it's been sitting in someone's house for a while, maybe collecting dust and memories.

    Cracks are all finished!
  6. Tone down the gold...if you want to - If you think your gold is too bright, you can use a paper towel to wipe quick, light strokes of brown paint onto the frame to tone it down a bit. If you pick a gold paint with a "vintage" or antiqued finish though, you should be okay as far as color goes.

  7. Add a clear coat...if you want to - If this is going to be used as a regular picture frame, once the acrylic dries all the way through, you should be good to go. However, if this frame is going to be used for something "high traffic" (like a jewelry display or something), you might want to add a few coats of poly or clear lacquer to the outside to make it more durable.
And that's it! Next time I'll take you through the steps that I use when I paint the top layer white and distress the frame.  Happy crafting.  :)

What to do with a thrifted picture frame, #1 - Embellish!

Stampington & Company, how I love thee...

So after getting the Winter Issue of Create with Me Magazine, I was inspired to do my own version of the room plaques in the "A Room of My Own" article by Lori Oles.


In the article, Oles does the artwork with her children (I'm assuming by their faces, they're older than my kiddo), but for my version, I did all the artwork and frame mods. I wanted to post pics mainly to show you what a bit of glue, trim, buttons, and fabric flowers could do to a $0.50 picture frame from the thrift store.

Here's what I came up with (sorry, no step-by-step photos...I'm working on that):


Yeah, the picture stinks...I took it with my phone to post on Facebook. But you get the idea, right!?! Here's what I did:

  1. Choose the frame - Mine was a silver colored metal one with little tiny rhinestones (some were missing). I got it for $0.50 at the Thrift Store. I took the guts and glass out, cleaned it all, then let it dry.

  2. Adding the ruffle - I had some leftover ruffle trim from a shirt I recycled for something else, and it was just the right amount. I used hot glue to affix the base of the trim to the frame, going around the rhinestone border (the trim wasn't wide enough to cover the whole frame).

  3. Securing the ruffle - After I hot-glues the ruffle in place, I used Crafter's Choice adhesive (CC from now on) to glue the bias-tape part of the trim shut and to further affix it to the frame.

  4. Adding the flowers and buttons - I have a bag of fabric flowers that I keep around...they're easy to make while watching TV in the evening, so I have lots. I pulled three "vintage" looking ones out of the bag and CC'd them to the trim.Then I picked out three matching buttons from my stash and covered the mitered joint in the trim corners.

  5. BLING! - The little rhinestones in the frame weren't big enough for my liking (they were pin-head sized), and some were missing, so I got out some flat sparklies and the CC and went to town. I also glued some sparklies to the corner buttons to cover the button holes.

  6. Adding the ribbon hanger - Once everything on the front was dry, I turned the frame over and glued some ribbon with the CC to the back to form a hanger. DONE!

The artwork inside was a different project, and I may go into detail a bit more about that in a later project, but I wanted to show you the frame redo first. There are several other things you can do with frames, but this was a cute, easy project that could be done as a gift for a little girl or new mom or as a project with a child age 7 and up (more help needed for the younger kids, but it would still be fun to pick out all the stuff!).

Now go make something!

Wednesday, July 27, 2011

Ooops, I forgot my reusable grocery bags!

That's okay, I'll just make a lamp. How cool is this?!?!? I want one.


Available at Zipper8Lighting's Etsy Store for $195. My birthday's coming up in October...

Thursday, July 21, 2011

Now I'm the student

I just signed up for a class @ Papershell myself. this looks like so much fun...my kiddo and I are going to make a piece of art together. Yea!

Easy Mosaic Suncatchers with Susie Curry

No grouting! This easy mosaic suncatcher project is suitable for adults and kids ages 6 and up! Apply rounded cathedral glass using a special adhesive sheet to acrylic forms -- you'll take your work home the very same day. Projects are about 8" and shapes vary. This class is $40 and includes all supplies, tools & refreshments. Email elizabeth@thepapershell.co​m or call (281) 232-4485 for more information.

Monday, July 11, 2011

Get off your duff and learn something!

I will be teaching a class at on July 23 at Papershell in Richmond about how to make fabric flowers. If you're not interested in that, then check out some other art classes coming up this month at Papershell. Get off the couch and learn something new, okay?


Art Classes for Adults and Children

It’s hot outside...come into the Gallery and take an art class in the AC! Class fees include all supplies, tools & materials, plus refreshments. Call 281-232-4485 or email Elizabeth at elizabeth@thepapershell.com for more information.

July 9 • Fused Glass Jewelry • 10am - 12pm • $60
Make your own fused glass pendant and earring set! It takes a while for the glass to harden, so you'll be able to pick yours up the next day. Artist Lisa Bonin leads this class.

July 17 • Glass Mosaic - Your Choice! • $90
Choose one of four projects: a 12x12 mirror, footed trivet, address plaque or stepping stone. The class will be taught be mosaic artist Susie Curry. Maximum class size is 8, so register now. Wear a smock or an apron!


July 23 • DIY Style - Fabric Flowers • 2pm - 4pm • $35
Join us for the first installment of our DIY Style class series with a botanical inspired project! Local jewelry artist and general DIY rebel Stevie Ballow will teach techniques to make different types of flowers from thrifted or new polyester and cotton material. Use the flowers to turn something from your closet into a fabulous piece of personal DIY couture, or use the techniques to create hair accessories, bookmarks, magnets, picture frames, gift packaging and anything else you can dream up. Max class size is 10; for ages 13 and up (DIYers under 18 must be accompanied by and adult).


July 27 • Easy Mosaic Suncatchers • 10am - 12pm • $40
No grouting! This easy mosaic suncatcher project is suitable for adults and kids ages 6 and up! Apply rounded cathedral glass using a special adhesive sheet to acrylic forms -- you'll take your work home the very same day. Projects are about 8" and shapes vary.

Tuesday, August 21, 2007

I was sick yesterday...

...and didn't post. So here's a double whammy for you (to make up for my slacking).
Katinka Pinka on EtsySan Marcos designer Kaite Wallace likes all things pink and imperfect. She takes vintage fabrics, beads, bags, and more and remakes them into pretty little things to wear and carry. I discovered her at a show here in Houston, and even though she's not from here, I thought I'd post her anyway. San Marcos isn't too far away...

Kaite's line is called Katinka Pinka, and it's available through Etsy.


Working in both watercolor and oil, Houston artist Selma Cooper's current work is focused on creating oil renderings of flowers. But these flowers aren't your ordinary still life...they're big and bold, and they are really more of a study in texture, color, and shape than actual flowers. But that's why they're so cool.

Cooper's painting can be found in the Reef Gallery in Key Largo, FL and Sheldon Fine Art gallery in Naples, FL; her work is also available through her website.

Wednesday, August 1, 2007

You Rock!

You rock...you are a rock. Or at least you could be...'Women that Rock' by Bonnie BlueHouston artist Bonnie Blue knows that women rock. She can pick up a smooth stone and give it a face...literally! In addition to "paper weight" type rocks, Bonnie uses smaller stones to create jewelry. She also creates custom items for the home and other wardrobe accessories.

Her cute characters and wacky women are the perfect gift for someone who needs a little pick-me-up (or just has a great sense of humor). No two are ever alike! Visit her website to order.

Wednesday, July 18, 2007

Dark Heat

And here is yet another fabulous example that art is alive here in Houston, this time by artist Marilyn Cassidy.

Whether she actually meant to capture Houston in her art, I can see the waves of heat rising up from the concrete in "Burn Red" (left) and the blurred motion that is the Houston nightlife in "BluePhire" (right).

Using oil and canvas, the images and color combinations that Cassidy creates range from stark to soft. Her paintings are emotional and sensual, and in her newest works, she combines dark and light, teasing the viewer with dashes of color. “...because I work large, painting is a whole body experience; I dance with the canvas.”


For more information about Cassidy or to purchase her paintings, visit her website and fill out a contact form. You can also check out her profile on the Worldwide Talent Database. Cheers.

Back from Market


I just got finished with my first market event. Yea! Rara Avis was a craft vendor at last Saturday at the Midtown Farmer's Market (at Monica Pope's t'afia restaurant on W. Alabama and Travis). The Midtown Farmer's Market runs every Saturday from 8am - 12pm, rain or shine, and has on of the best selections of locally grown and organic produce and prepared foods around...including items prepared there at t'afia. I was a part of the "Second Saturday Shopping Spree" event featuring the normal rotation of food items plus a selection of artists and craftspeople with handmade goods. Fellow Houston Craft Mafia member Lisa from Fetosoap was there, as well as several other talented artists (if I can get the names, I'll post them all). All the items that I brought were handmade by me.

Jewelry tree for EUTECTIC handcrafted jewelry
All three Rara Avis stationery brands: "Signature," "The White Tree," & "Inked,"

I plan on attending the August 18th Spree event, so if you missed me this time (since I was bad and didn't post BEFORE the event), you can catch me then. Also, if any of you know of upcoming art or craft shows in the area, let me know and I'll post about them too. Cheers.

PS - Thanks to Lisa from Fetosoap for the pics. If you'd like to see a few more, go to my Flickr page.

Friday, July 6, 2007

Worth 1000 words...

Or so they say... I think pictures are worth more than that -- they are a look into someone else's head, they form a connection between people. And if you're lucky, sometimes you find just the right one.
Marilyn Devenport PhotographyHouston fine-art photographer Marilyn Davenport has been bringing us beautiful pictures since 1970's. She has worked with film, digital, and black & white mediums on subjects ranging from Fashion to Architecture. She also hosts a blog in which she posts advice, inspiration, and "How-To's" for aspiring photographers.
Marilyn Davenport PhotographyDavenport has received numerous awards, and her "Vintage Vegas" series has been accepted into Houston's FOTOFEST 2008.

All of the photography on her website is available for purchase. Consider this as your insider's sneak peek: purchase her work before FOTOFEST...you may not get to after she becomes an international superstar! :) Cheers.

Wednesday, July 4, 2007

In stitches

If you were an artist and somone came and took away all your pencils and paintbrushes, how would you keep creating? How about quilting?

Houston artist Kay Cox did just that. Practiced in several different art mediums (pottery, watercolor, charcoal, sketching), Cox is now bringing her sketches to fabric. "I am really having fun enlarging these drawings [sketches] and putting them to fabric. Must be something about giving them texture. All those years of working in clay seems to still be an influence...always seeking texture." Did I mention that she used to be a potter?

So far, Cox has created two other quilts like this one (here and here). She is a member of WIVLA and an Artist Way group that has met twice a week for the last 8 years. For more information or two see her work "in the fabric," check out her blog and send her a note.

Cheers.

Thursday, June 28, 2007

Picasso was a Cubist

No, that's not a bad thing...and neither is this:
Based in Montrose, Cubist Literature creates one-of-a-kind garments from vintage and recycled clothing by sewing on cute little (sometimes big) appliques. Bunnies, owls, hearts, and other strange creatures adorn t-shirts, sweaters, pants, jackets, and other items. Cubist Literature also offers hand-spun yarns, buttons, art, and even music in his Etsy shop. He'll even stitch stuff on your own garmets (in case you don't trust your bod to vintage sizing).
As you can see, he's a pretty decent photographer. Check out the Cubist Literature Flickr page for more pics of current and past items as well as other nonus (you know...people, places, and things).

Cheers.

Tuesday, June 26, 2007

Concentrics

There's just something beautiful and soothing about circles and rings. They symbolize life, love, journeys, ripples, movement...what other shape is so amazing? Houston artist Orna Feinstien shows us rings at their most magnificent.


The images above are from her "Branched and Rooted" series of monoprints (what's a monoprint?). Specializing in monoprints and other mixed media, Feinstein is inspired by the beauty, texture, and energy of nature. The "Branched and Rooted" series deals specifically with imagery of trees, their trunks, branches, and roots.

Feinstein has won numerous awards and participated in both exhibitions and juried shows throughout Houston and across the nation. Her work is available for viewing and purchasing at the Anya Tish Gallery in Houston.

Surf beautifully. Cheers.

Thursday, May 31, 2007

Tammy hates the "B" Word


Didn't we all wish we were Barbie at least once in our childhoods? The cute boyfriend, the nice house, the great hair, the horses, the cars, and ALL THOSE SHOES! Not local Houston photographer Debra Rueb...she wanted to be Tammy, a Barbie alternative that we can now all identify with thanks to Debra's cheeky and fun photography. Taking widely used cliches, puns, and metaphors, Debra uses Tammy to create images that we can all identify with... "the 'B' word" or "standing in someone else's shoes."

Debra has been working as a professional photographer since the 70's. Her work includes portraits, commercial photography, travel and adventure, and other subjects. Her works have been published in newspapers and magazines as well as featured in local and internatioanl exhibitions, and she was a participant in Houston's Fotofest. Debra is a member of WIVLA and currently teaches photography at Alvin Community College.

Monday, April 30, 2007

The grass really is greener on the other side


I like to shop, mostly because it gives me the opportunity to find new designers and boutiques. While doing my daily hunt for cool stores in Houston, I came across greener grass design and gift, a web-based Houston boutique that has both a clean, crisp look and a great stock of unique and nifty items (both big +'s in this surfer's notebook).
"Rather than support the further standardization of design, we want to seek products which
can have added value, be beautiful, functional and have lasting significance," states the authors in the "About Us" page of the site. The site has stuff for your home, your pet, your kids, and you; the products range from just the plain weird "Cube Clock" to eco-friendly organic cotton "Onsie and Beanie" set.

My favorite pieces on the site are the "Fireplace for the Tabletop" by Carl Mertens and "Eddie's Cat Room" by The Pet Project.

Happy Shopping. Cheers.

Thursday, April 26, 2007

Here is my handle, here is my spout


Teapot + spoons = wind chime! These are pretty darn cute, and dare I say it..."whimsical" (I really hate that word, but it applies here). Created by the folks at Whistle & Wine in the Heights area, these chimes are made from recycled teapots and silverware. At a reasonable $25 for a teapot chime with a plant, these might just be the perfect gift for say, Mother's Day? And if teapots aren't your fave, they make chime with wine bottles as well.

If you'd like to see some of them in person, Whistle and Wine will be at Yesterfest in Bastrop, TX this weekend and the American Legion Art & Craft Sale in Spring on May 5th-6th.